

I hope you can agree with me when I say:
A beautiful graphical user interface (GUI)
Can be hard to make:
Getting it to look really look beautiful is even HARDER.
Or is it?
Well, it turns out.
You can dramatically increase the look of your GUI’s by using one simple method…
…a method that has helped me make GUI’s that look amazing
with only a few extra lines of Ahk code.
In today’s post (and video)
I am going to show you what that method is…
and exactly how you can easily use it.
Degree of difficulty: 3 / 10
This post contains example code for the free open-source scripting language AutoHotkey.
All you need:
- AutoHotkey ( Download | Website)
- A text editor like Notepad or something like SciTE4AutoHotkey
- Some images
And 15 line of code ( plain text ) from this tutorial.
As always there are free download links at the end of this post, for both the finished working Autohotkey script with all the shown lines and also a compiled exe with the same for those who’d only like to try and see this graphical user interface live.
Example video: (0:36)

It’s so simple:
The method to make beautiful graphical user interfaces every time, is that you simply use images.
It’s up to you how you get, make or find the images, when you have them, all you do is use them as GUI controls.
This is made easy with AutoHotkey as the picture control is built-in to the gui commands of AutoHotkey.
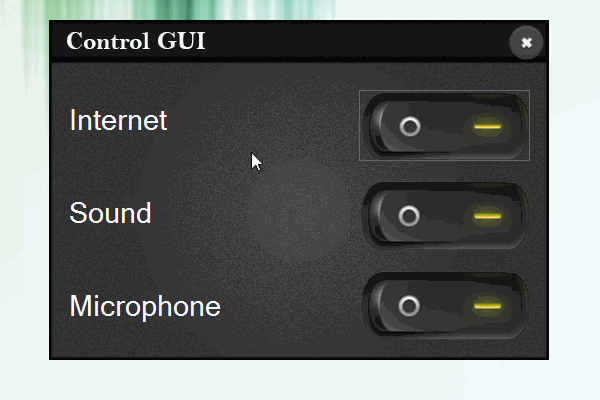
1. Choose the right images for your beautiful graphical user interface.
So for this guide you will need some images, to get the look of the GUI above you’ll only need the 5 images shown below, but you can also
-
Create them on your own
- Images can be something you make yourself like me, this will make your GUI truly unique and it can be done with free programs like Gimp or a paid one like Photoshop, both have lots of tutorials online you can use, or you can edit free images, like I did with some of the images used in this tutorial.
-
Find images to use
- You can easily find image sets online with a query like “free Photoshop ui kits” on google, which will give you lots of idea’s or even ready images you can use as you see fit for your beautiful custom user interface.
Here’s the 5 images you need to get the look of the GUI above, we will get to the 15 lines of plain text (code) in a moment, I’ll show you step by step how to make it, but first let’s start with the images I used:
titlebar2.png
![]()
button off 1.png

Close Circle Buttons.png
![]()
button on 1.png

bg.png

Images (.zip)
The AutoHotkey help file section about GUI’s is a great place to look if you need to know more about any of the Gui commands in AutoHotkey
2. How to start making your graphical user interface.
Start with a new text file and in the first line you can and will set one or more Options for the overall graphical user interface, so start with “Gui, ” and then you Specify with a plus sign [+] to add an option or a minus sign [-] to remove an option,
For this Gui we only need to remove the windows Caption because we will use one of the images as our own custom title bar so remove the Caption with “-Caption” like this:
Gui, -Caption
Now on the next line let’s set the overall size of text in the Gui, for this we will use the Font command and the (s) for size option followed by a number (points) we like the size of our Gui text to be, for the example Gui in this guide you will use a font size of 22:
Gui, font, s22
3. How to get you images to look like a graphical user interface.
Next line! You’ll add the first Picture to the user interface, the custom title bar (an image with a width of 500 pixels and a height of 40 pixels), to do this you will need to use the “Gui, Add, Picture,” command, you also need to set where in the Gui you like the pic to show up, to do that you will set some coordinates aka X,Y options, and last you need to tell where the image is stored by inputting the path to the image file, if the image is in the same folder as the script file you only need to input the file name:
Gui, Add, Picture, x0 y0 gUImove, titlebar2.png
After that it’s time to set the close button image, so again you will use “Gui, Add, Picture,” and input the X,Y options but this time you also use the (g) option for g-label (goto label) this will make the script perform the subroutine under the label with the name you set, and as it is a close button let’s call the label “close”. Now to make sure any transparency in the image is used we will turn Background transparency on with “+BackgroundTrans” so the line will look like this:
Gui, Add, Picture, x458 y4 gclose +BackgroundTrans, Close Circle Buttons.png
Now for your Background image, you will again use “Gui, Add, Picture,” with the X option set to 0(zero) and the Y set to 40 aka the height of the title bar image, and the path to the image file or the name of the image file.
Gui, Add, Picture, x0 y40, bg.png
So now we have something like this: ( This won’t work YET as code letter in the tutorial is needed )

And that’s with only 5 lines of script and 3 images
4. How to make a row with text and a button.
Next I’ll start by telling you how to make the first row of text and button, this part will be almost the same for all 3 rows in this beautiful graphical user interface.
Ok now for the line of text we will use “Gui, Add, Text, ” and again set the coordinates of the text with the X,Y options, you’ll also need to use “+BackgroundTrans” to set the texts background to transparent and for the last parameter you’ll input the text to show in your graphical user interface, for this guides GUI, it will be “Internet”.
Gui, Add, Text, x20 y83 +BackgroundTrans, Internet
To make an on/off button like the ones in the GUI of this tutorial you need two pictures, one for the off state and one for the on state.
Now for the first state image you will again use “Gui, Add, Picture,” and set the X,Y coordinates and make the background transparent with “+BackgroundTrans”, but this time you will also need to use the (v) option this will enable you to give the image a variable name.
This it will be easy for you to manipulate it later, also remember to set a g-label for the sub-routine that will toggle the image of the button when you press it, and anything else you like to happen when the button is clicked.
For this guide we use a label called “click” for the first button, the last thing you need, is to put in the path or name of the “on button” image file.
Gui, Add, Picture, x310 y70 +BackgroundTrans vC1 gClick, button on 1.png
Next for the off state button you will do the same thing again, same options except for the (v) option and the name of the image.
But as you only need to show one image in the same spot at any given time you also add the hidden option so that when you show the GUI the off image will be hidden until you need it.
Gui, Add, Picture, x310 y70 +BackgroundTrans vC2 gClick hidden, button off 1.png
That’s only 8 lines and it looks like this: ( This won’t work YET as code letter in the tutorial is needed )

So if all you need is a graphical user interface to start or stop one thing like a script or routine then that’s about all you need to get a beautiful interface for that.
5. Making more text rows and buttons.
To make the beautiful graphical user interface in this guide you will need to do 2 more button code blocks, I will also end by briefly going over how-to make the buttons toggle, and remember that all of the script is downloadable at the end of this tutorial.
So for the next line of text you will use “Gui, Add, Text, ” and set the options like “x y +BackgroundTrans” also set the last parameter (the visible text), for this guide’s GUI it will be “Sound”.
Gui, Add, Text, x20 y176 +BackgroundTrans, Sound
Then you put in two lines of “Gui, Add, Picture, ” and both with the same options, coordinates, trans, variable (v#), g-label (click1) and for the last parameter you use the 2 images of the button again .
Gui, Add, Picture, x310 y160 +BackgroundTrans vx1 gClick1, button on 1.png
Gui, Add, Picture, x310 y160 +BackgroundTrans vx2 gClick1 hidden, button off 1.png
After 11 lines of code this is how it looks. ( This won’t work YET as code letter in the tutorial is needed )

Again for the last row you do like this
Gui, Add, Text, x20 y269 +BackgroundTrans, Microphone
Gui, Add, Picture, x310 y250 +BackgroundTrans vy1 gClick2, button on 1.png
Gui, Add, Picture, x310 y250 +BackgroundTrans vy2 gClick2 hidden, button off 1.png
6. How to make it all visible.
Now for the command that will show this beautiful graphical user interface on the screen.
For this you use “Gui, Show, ” and then you can set some options like the X,Y of the upper left corner of the GUI or the size of the window like in this guide the options (w) and (h) tells the script to show a GUI window that is 500 pixels in Width and 340 pixels in Height.
Gui, Show, w500 h340
Click to Tweet: There it is a beautiful graphical user interface in 15 lines DONE!

If you don’t need to do 3 things you can do it with less, you can also make a background image with your text and save 3 more lines.
7. Making Your interface interactive.
Ok I must admit that the GUI on its own with only 15 lines can’t do anything, but it looks really good.
So i will show you a little more, but only briefly, like how to write the routines that toggles the buttons in our now beautiful graphical user interface.
You will need to prepare some variables that will hold the status of the button, you can do this by making and setting the same number of variables as you have buttons to a value of 1, for this guide that’s 3 variables you put right under the “GUI, Show ” line and it looks like this.
ci := 1, xi := 1, yi := 1
Now in the next line put a “return” to tell the script to stop and wait for the user to interact with the GUI.
Return
So now if this script is run you will see a beautiful graphical user interface that looks like the one at the top of this page, let’s look at some of the code that will give your interface the functionality it needs.
7.1 Dragging by titlebar routine.
First thing, How-to make your GUI movable by dragging it by the titlebar.
For this you will make a routine under the g-label “UImove” it’s the one seen above in the options when you added the titlebar image.
A routine label looks simple as it is just the name of the label with a “:” after it, in this guide it looks like this
UImove:
Right under the label you will use “PostMessage” to post a windows message to the OS telling it to let you drag your GUI, it looks like this
PostMessage, 0xA1, 2,,, A
That’s it, now you end your routine with a “return” like this
Return
Now your GUI will be draggable, next you will have to write 3 routines one for each of the buttons, but in this guide I’ll only walk you through the first one, seeing as the part that’s used to toggle the button state images is the same for each button.
7.2 Toggle button state routine.
So start with the label from the first button like this
Click:
Next use the command “GuiControl ” with the “hide” option to make sure the image with the last state is hidden, for the last parameter, put in the variable that hold’s the state of this routines button, like this
GuiControl Hide, c%ci%
Then you need to set the value of the new state of the button, in the buttons state variable, this can be done in more ways than one, the one you will use for this guide looks like this
ci := 3 – ci
Now you will use the command “GuiControl ” again with the “show” option this time to show the image with the new state of the button, this line looks like this
GuiControl Show, c%ci%
Ones again ending the routine with a “return”.
Return
That’s the first buttons toggling routine the next two look almost the same.
Click1:
GuiControl Hide, x%xi%
xi := 3 - xi
GuiControl Show, x%xi%
Return
Click2:
    GuiControl Hide, y%yi%
    yi := 3 - yi
    GuiControl Show, y%yi%
Return
8. How to close it when done.
Last op is the closing routine for the GUI, for this tutorial it starts with the label from you close buttons (g) option
close:
Under that you can also (optionally) put a build in label that is called if any user presses ESC while the GUI is active.
GuiEscape:
And for the finishing line of your script you put
Exitapp

Conclusion
That is one of the ways you can make a beautiful graphical user interface, and I also showed you how-to make the GUI usable although not with as much detail, but that is only because there is just too much to cover in one guide.
Of course there are many other ways to do this and I’d be glad to cover them in later tutorials if you wish? Please tell me what other GUI questions you have or like me to answer.
Examples of some other great graphical user interface:


If you have any questions or ways that you use to help you remember how to use your programs, please feel free to use the comments or contact page and tell me all about it.
Try it:
To use your new script, continue as follows:
- Write or Copy all the line above and then Save the file as .ahk and close the file. (remember you also need the images)
- Double-click the file to launch it. A new icon appears in the taskbar notification area.
- Some scripts may need you to press a Hotkey or Hotstring to see the script in action
- To exit or edit the script, right-click the green “H” icon in the taskbar notification area. (and click the exit option)
Notes:
AutoHotkey scripts can easily do lots of other things than I have shown you in this tutorial.
You can also have many scripts running simultaneously, each with its own icon in the taskbar notification area all doing their tasks automatically.
To have this script start automatically when you start your computer, create a shortcut to the script file in the Start Menu’s Startup folder.
Downloads:
Script (.ahk)
Application (.exe)
Images (.zip)


Wow your site is REALLY broken…
I could not download any of the files.
Is this site even still maintained?
Or am I shouting into a room full of echoes right now?
Hi, sorry you had issues downloading, I just tested a few download links and all of them seems to work, can you tell me one of the ones you had issues with?
Hey, I appreciate the reply!
I wasn’t able to navigate the whole cart download process at the time. It was just kind of a totally new thing for me.
Sorry if I came off as rude. I had a bit to drink.
I appreciate this article and the code you provided!
Sir Can you make tell me how to make a simple toggle button for suspend/unsuspend two of scripts
very important :
you will get a white flicker when clicking on buttons , to solve it use :
Click:
GuiControl Hide, c%ci%
GuiControl, +Redraw, c%ci%
ci := 3 – ci
GuiControl Show, c%ci%
GuiControl, -Redraw, c%ci%
At the end of your article you show a few additional examples of GUIs. Two of those examples have round corners and transparency. I’m trying to do exactly that with AHK and haven’t found a way. I have found a way to add binary (all or nothing) transparency for a given color, but I want to use a PNG with a soft shadow and I want whatever is behind the AHK GUI to show through. Is that possible with AHK? Thanks.
well it is possible, but not really easily done by just using static images like in this post, even if it can be done i’d say you will have a better time doing it using
layered windows via GDI+ https://autohotkey.com/board/topic/29449-gdi-standard-library-145-by-tic/
or building your Gui with HTML and CSS https://www.autohotkey.com/boards/viewtopic.php?t=4588
On the night I wrote to you I found a workaround using an app called Overlap Wallpaper. I want to do this right, without that app, but I haven’t been able to get back to this project yet. Thank you for your reply. I’ll try those things someday.
Hi is there a working version of this script. I’ve tried to follow it as best i can but it seems you’ve forgotten some commas (usually after y position) which has made it hard to follow.
For example:
Gui, Add, Picture, x310 y70 +BackgroundTrans vC1 gClick, button on 1.png
I’m only just learning to code so the variables and G labels i don’t fully understand to be able to correct them, if they’re wrong that is.
Hi, well the version you can download works just fine, and the lines shown in this post comes from that exact working script… and i don’t see any missing commas in the line you posted.
Thank you for this!
I just starting AHK and have a real nice script but with just using tooltips telling users the keys to press to do certain things. I expected putting together a gui was going to take me a few days just learning and finding code, but…. You just saved me probably a day or two.
THANK YOU!
Thank you for the nice words, happy to help
15 lines of code my ass. This is over 30 lines and has basically no functionality.
I mean kudos for trying to help, but don’t freaking lie about it to get clicks…
Sorry you feel that way, if you keep it down to just the controls or only go with one butten it is less then 15 lines and i even emphasize this in a few places…
Try reading the whole thing next time, troll.
[…] a Beautiful GUI in 15 lines or less by Jackie […]
Got the switches to work finally!Had to spend some time reverse engineer your code to figure out what everything was doing. Recreated the GUI as a doubble mirror image and changed text and background colors then i was able to figure out a way to get it to work as off/on for app or device.Did not fully understand how it was all working. Is this along the lines of what you were directing me to?
toggle := 0
return
click:
toggle := !toggle
if (toggle = 1) {
Process, Close, firefox.exe
}
else {
Run Firefox
}
GuiControl Hide, c%ci%
ci := 3 – ci
GuiControl Show, c%ci%
Return
Thank You!
Ed
Nice tutorial, I have been beuilding AHK guis for a while now and love it. I have used a gosub handle for grabbing and moving windows before, but now I use the common MouseOver() function for better control over areas. With MouseOver() you can also create grabbing areas without any handles or buttons, pics etc…
Usally something like this:
OnMessage(0x200,”WM_MOUSEHOVER”)
MouseOver(vXa, vYa, vXb, vYb)
{
MouseGetPos, vPx, vPy
vDtct := vPx >= vXa AND vPx = vYa AND vPy <= vYb
Return vDtct
}
WM_MOUSEHOVER(){
If MouseOver("0", "0", "200", "50")
; Any code/action you like
If MouseOver("0", "51", "200", "100")
; Different action for a different area
}
This can be used to do just about anything you like.
Forgot to add OnMessage(0x201, “WM_LBUTTONDOWN”) for left click actions instead of hovering, but like I said you can do all kinds of stuff with this.
E.g.
WM_LBUTTONDOWN(){
If MouseOver(“0”, “0”, “200”, “50”)
; Any code/action you like
If MouseOver(“0”, “51”, “200”, “100”)
; Different action for a different area
}
Hi Ian,
Yeah both are nice tools/functions that can be very useful,
Thanks for sharing 🙂
I’ve used both in other scripts like this https://autohotkey.com/boards/viewtopic.php?t=184
Just checked that learner out, very cool for people starting out. Looks like the same kind of tutorial structure as CodeCademy and similar. I have lots of good examples with the scripts if anyone cares to learn from examples. Not selling anything, just free scripts here: https://techmicrocosm.blogspot.com/ The first two posts are good examples.
Hi, thank’s a lot for posting this!!
I’ve been trying to creare something similar to the Login UI you have posted here, but I’m having so much trouble with the edit box to be transparent or to make it be rounded-shaped as in your image. Could you please give me a hint on it?
Best regards!!
Looks awesome.
How do I display just the image with no grey background?
I want a transparent background.
I’ve googled and it seems difficult to show PNGs with no background?
Thanks.
Very cool! I like the additional functionality of indicating the active button! Thank you!
Thanks joetazz,
Nice of you to say so and glad that you like it 🙂
That is exactly what I was looking for. Thanks again for providing this solution.
Hi Jackie,
this graphical user interface of yours just looks great. I really would like to use
this script on my multimedia system with my remote. Issue is that with the remote
I can not select the buttons (no mouse click) 🙁 and being rather new to AHK I just
can’t figure out a way to switch the buttons with curser keys and return, which
would work to select them with my remote.
Any idea on how your script could be modified to work without mouse ?
Hi Matthias,
Thanks for saying so!
I’d add a hidden button control for each set of images
So it will end up looking something like this
Hope that works for you
You are a genius. Not having tried it yet, but this looks so easy and lean it just
has to work ;-). I would never have come up with this solution, just marvellous.
Sure works :-), but remember to use the “Tab” key to move the lines.
Well nothing ever seems to be as simple as it looks. I am desperately trying to add
some focus indication, like i.e. change of font color, to see which control is active
to be switched on the gui when pressing return. Even searching the web up and down I seem to be unable to get this done.
Maybe you have another kind suggestion on how to add this function to the script?
Yeah that one has a lot of possible solutions
Depending on what you’re hoping for
One way is to make or change the images
to include a version of the button with a focus state
Another one that does not look too well
But is easy to do is to give the hidden
buttons some Width and height
I on the other hand made an example of a
third option aka making a hotkey routine
that runs when tab is pressed with the
gui active that gives and removes a
focus border around the current button image
It looks something like this
And you can download the modified version of the script here
https://jszapp.com/downloads/beautiful-gui-with-focus-border/
Hi Jackie,
thanks a lot for sharing this. I’m usually much more of a PowerShell automation guy, but seeing how easy things can be done through AHK I’m really interested now and would appreciate additional UI tutorials including some pointers on how to produce those images (since I’ve also never done that myself).
Dirk
Hi Drik,
Your welcome,
I am already working on more Gui tutorials
I also think that the idea about digging deeper into how you can make your own GUI images is a good idea…
I will remember to include more of that 🙂
I would be very interested in getting more tutorials on how to improve the UI of AHK scripts. Do you have any suggestions on trying to update the looks of some of the built in controls for GUI’s such as ListView?
Also, if you have a tutorial on how that log-in screen I would be curious to see how you set that up.
Hi Tom,
I’m happy to hear about your interest in UI tutorials, i’m already working on making more.
The “log-in screen” as you call it is one of them…
As to suggestions on customizing AHk’s controls there are already a lot to be found like this list: http://www.autohotkey.com/board/topic/17942-custom-gui-controls-gui-related/
Also support for embedding custom controls was added in AHk version 1.1.10: http://ahkscript.org/docs/commands/GuiControls.htm#Custom
Keep an eye out or join the news list to be emailed when the upcoming UI tutorials are released.
Hi, thanks for posting this! I’m curious as to how I would get the button to go back to it’s original state after being released, instead of being a “toggle” switch. Any help would be much appreciated. Thank you so much!
Hi Jayme,
The glabels used in the script as seen in this topic are first called when the mouse button is released.
So you can’t use them the way you wish, instead you can use your own mouse monitoring routine for the left mouse button down event, it may look something like this
OnMessage(WM_LBUTTONDOWN := 0x0201, "OnLButtonDown")

OnLButtonDown()
{
	index := {1:2,2:1}
	if A_GuiControl in c1,c2,x1,x2,y1,y2
	{
	Array := StrSplit(A_GuiControl)

	GuiControl Hide, % A_GuiControl
	control := Array[1] . index[Array[2]]
	GuiControl Show, %control%

	while GetKeyState("LButton", "P")
		sleep 10

	GuiControl Hide, %control%
	GuiControl Show, % A_GuiControl
	}
}
Hope that helps and of course you’re always welcome to contact me via mail or the contact form if you need more help
Thank you so much for your reply! Sorry for the delay, I didn’t see this message in my inbox. I’m afraid I’m not very keen with AHK enough to know how to implement this method you mention. Can you show me where or how I would place it in a document? I was able to follow the initial tutorial pretty well, but I tried cutting and pasting this script into a ahk document and it didn’t do anything. Thanks so much for your time!
Thanks so much for this.
For some reason this doesn’t work with my version of AHK. (Not sure which version)
So I did some work and some digging and I finally figured out this fix:
Make the variables end in “0” & “1” (i.e. vc0, vc1 instead of vc1, vc2)
and
Click:
GuiControl Hide, c%ci%
>ci := !ci
GuiControl Show, c%ci%
return
Click1:
GuiControl Hide, x%xi%
>xi := !xi
GuiControl Show, x%xi%
Return
When you go to retrieve the variables to run stuff:
ButtonOK:
Click := !ci
Click1 := !xi
MsgBox, 1st Picture status? %click%`n2nd Picture? %click1%
Thanks again for giving me the foundation to make this Happen.
Hi canisdibellum,
You are welcome, I always use the newest version from http://ahkscript.org/download/ and it all worked in my tests.
Did you try the EXE version?
Still I’m just glad you found a fix that made it work for you.
Great Tutorial.Thank you!
How would I use this to control volume on off or open and close an application with toggle?
Thank youn Ed
Thank you!
Well you’ed put the code for the given action in the click routine you wish to do that action 🙂
For toggling a program on or off the winexist command together with an if statement do a close or run action…
Thank You for such a quick response and again for a great tutorial.
I hope to see more tutorials. You have showed me Ahk is way beyond what i have used it for (new to ahk) and I have much to learn. I attempted to get it to work before I posted and Will attempt to read up on what you have advised.
I think The code you wrote is still beyond my full understanding and I will need to spend more time in order to fully understand it. I can bash script and do some Vb but ahk seems to confuse me for some reason.
Thank you! Ed